Master n8n in 36 Minutes: Build AI Workflows and Automations from Scratch
What is n8n?
n8n is an open-source, node-based automation platform that is rapidly gaining popularity among developers, digital strategists, and business owners who want to build powerful automations and AI agents — without writing complex code. Think of it as a visual programming environment where you connect different apps and services together using “nodes,” each representing a specific action or trigger. This n8n guide will walk you through everything you need to know to go from zero to building real AI workflows and automations from scratch.
What sets n8n apart from tools like Zapier or Make (formerly Integromat) is its flexibility and depth. n8n can be self-hosted on your own server, giving you complete data privacy and control. It also offers a generous free tier on its cloud platform, and because it is open-source, you can extend it with custom code, build your own nodes, and integrate virtually any API in the world. For teams and businesses that want automation without vendor lock-in, n8n is one of the most powerful options available today.
Automations vs. Agents
Before diving in, it is important to understand the two main types of workflows you can build with n8n, because they work very differently and serve different purposes.
- Automations: These follow a fixed, predefined sequence of steps — A to B to C. They are deterministic, meaning they always do the same thing when triggered. A daily weather email, a social media scheduler, or a form-to-CRM pipeline are all examples of automations. They are reliable, fast to build, and perfect for repetitive tasks.
- Agents: These are dynamic and intelligent. Rather than following a fixed path, an AI agent can reason, make decisions, and choose which actions to take based on the context it receives. For example, an AI agent could read an incoming email, decide whether it needs a human reply, draft a response, check your calendar for availability, and send the email — all autonomously. Agents leverage large language models (LLMs) like GPT-4 or Claude to power their reasoning.
This guide will cover both types, starting with a practical automation to get you comfortable with n8n’s interface, and then moving toward building AI-powered agents that can handle complex, multi-step tasks.
Why Learn n8n? The Case for Workflow Automation
Before getting into the technical details, it is worth pausing on why learning n8n is one of the highest-leverage skills you can develop right now. The average knowledge worker spends anywhere from 20 to 40 percent of their time on repetitive, manual tasks — copying data between apps, sending status update emails, generating reports, or following up with leads. These are tasks that automation can handle in milliseconds, freeing you up for the creative and strategic work that actually requires human intelligence.
n8n sits at the intersection of automation and AI, which makes it uniquely powerful. You are not just automating static processes — you can inject AI reasoning at any point in a workflow. Need to summarize a long document before filing it? Drop a GPT node in. Want to classify incoming support tickets by urgency? An AI node can do that in real time. This combination of reliable automation with intelligent decision-making is what makes n8n a game-changer for individuals and teams alike.
What Can You Use n8n For?
n8n is versatile enough to handle an enormous range of use cases. Here are the main categories and some specific examples within each:
- Personal Productivity: Build personal assistants to manage emails, calendars, and documents. For example, you could create a workflow that monitors your inbox for specific keywords, automatically labels and archives emails, and sends you a daily digest of action items each morning.
- Marketing and Business: Automate social media posting, manage CRM updates, handle customer onboarding sequences, and run sales processes end-to-end. Imagine a workflow that takes a new lead from your website form, enriches their data using a tool like Clearbit, adds them to your CRM, sends a personalized welcome email, and notifies your sales team on Slack — all within seconds of them submitting the form.
- E-commerce: Sync product data across platforms, process orders, handle customer support tickets, send shipping notifications, and generate inventory reports automatically. n8n connects with Shopify, WooCommerce, and dozens of other e-commerce platforms natively.
- Data and Reporting: Pull data from multiple sources, clean and transform it, and generate reports automatically. A common use case is pulling sales data from Stripe, combining it with traffic data from Google Analytics, and pushing a formatted report into a Google Sheet or Notion database every Monday morning.
- Home and Lifestyle: Connect smart home devices and trigger routines based on time, location, or other conditions. n8n integrates with platforms like Home Assistant, allowing you to build sophisticated home automation logic beyond what consumer apps offer.
- AI Integrations: Hook up large language models, image generation tools, or custom APIs for text summarization, content creation, sentiment analysis, or building fully autonomous agents. n8n has native integrations with OpenAI, Anthropic, Google Gemini, and many more AI providers.
Whether you are a solopreneur trying to scale without hiring, a marketing team trying to eliminate manual reporting, or a developer building AI-powered products, n8n can fit your workflow and your budget.
Getting Started with n8n: Installation and Setup
Before you can build workflows, you need access to n8n. There are two primary ways to get started:
n8n Cloud: The easiest option for beginners. Go to n8n.io and sign up for a free account. The cloud version requires no installation or server management, and you can start building workflows immediately. The free tier includes a generous number of executions per month, which is more than enough to learn and build personal projects.
Self-Hosted n8n: For those who want full control over their data or need to run n8n at scale, self-hosting is the way to go. You can run n8n on any server using Docker with a single command: docker run -it --rm --name n8n -p 5678:5678 docker.n8n.io/n8nio/n8n. This spins up a local instance accessible at localhost:5678. For production deployments, most users run n8n on a VPS (like DigitalOcean or Hetzner) behind a reverse proxy like Nginx or Caddy.
Once you are in the n8n interface, you will see the main canvas — a blank workspace where your workflow nodes will live. The left sidebar gives you access to all available integrations, and the top toolbar lets you manage your workflows, credentials, and settings.
Understanding the n8n Interface and Core Concepts
n8n has a relatively small learning curve once you understand a few core concepts. Before building anything, let’s cover the fundamentals that will make everything else click.
Nodes
Everything in n8n is a node. Each node represents a single unit of work — it either listens for something to happen (a trigger node) or performs an action (an action node). There are three main categories of nodes:
- Trigger Nodes: These start your workflow. Examples include a Schedule Trigger (run every day at 6am), a Webhook Trigger (run whenever a specific URL receives an HTTP request), or an Email Trigger (run whenever a new email arrives in your inbox).
- Action Nodes: These do something — send an email, create a record in a database, make an API call, post to social media, etc. n8n has over 400 native integrations, meaning there are pre-built action nodes for most popular apps and services.
- Utility Nodes: These help you manipulate data and control the flow of your workflow. Examples include the IF node (conditional branching), the Set node (transform and reshape data), the Merge node (combine data from multiple branches), and the Code node (run custom JavaScript or Python).
Data Flow and the Item System
Data in n8n flows through your workflow as “items” — individual records that pass from one node to the next. Each node receives items from the previous node, processes them, and outputs new or modified items to the next node. This item-based system is what makes n8n so powerful for data processing: if your trigger produces 50 items, every subsequent node will process all 50 automatically, without you needing to write any loops or iteration logic.
Each node in n8n has three main parts: the Input panel (showing data coming in from the previous node), the Settings panel (where you configure the node), and the Output panel (showing data produced by the node to pass forward). You can click on any node at any time to inspect what data is flowing through it, which makes debugging extremely intuitive.
Expressions and Dynamic Data
One of n8n’s most powerful features is expressions — a way to reference data from any previous node directly within your configuration. Instead of hardcoding a value, you can use double curly braces to inject dynamic data. For example, in a Gmail node’s message body, you could write: Good morning! Today's temperature is {{ $json.temperature }}°F. The {{ $json.temperature }} part tells n8n to pull the temperature value from the previous node’s output at runtime. This is how you build workflows that respond to real, live data rather than static values.
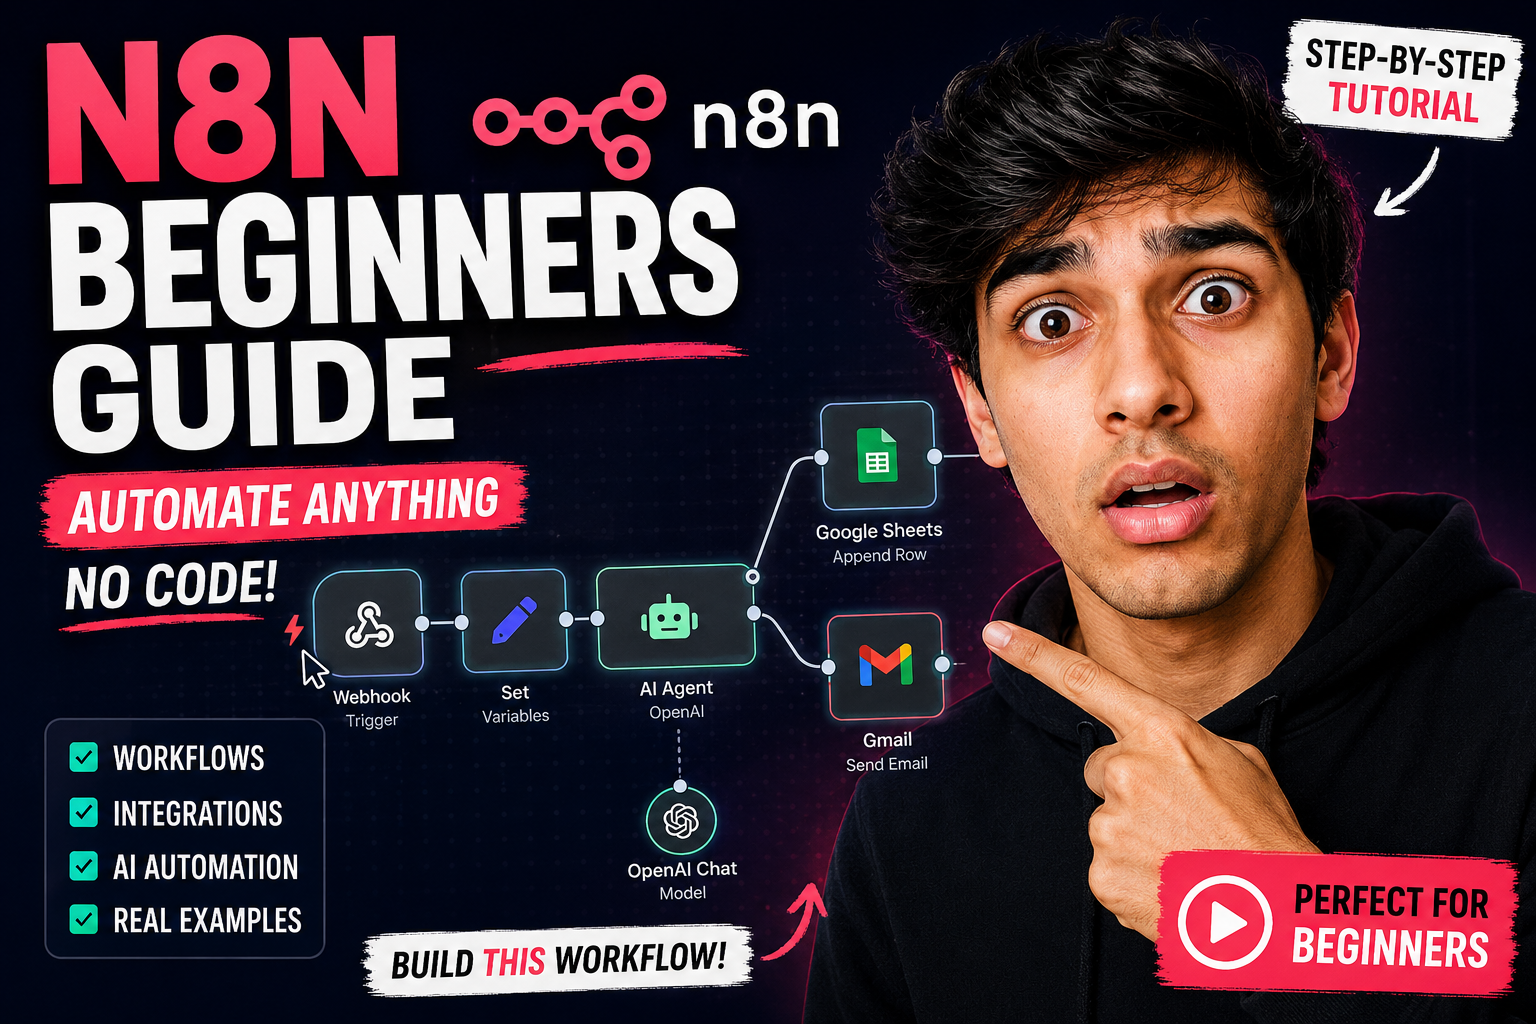
Building Your First Automation: Daily Weather Email
Now that you understand the core concepts, let’s build your first real automation: a workflow that runs every day at 6:00 AM, fetches the current weather for your location, and emails you a morning briefing. This project will introduce you to schedule triggers, API integrations, credentials management, and dynamic data expressions — all in one workflow.
Step 1: Create a New Workflow
- Open n8n and click the “New Workflow” button.
- Name it “Daily Weather Email” — descriptive names will save you time when managing multiple workflows later.
- The canvas will be blank and ready for your first node.
Step 2: Add a Schedule Trigger Node
- Click the large “+” button in the center of the canvas to add your first node.
- Search for “Schedule Trigger” and select it.
- Configure it to run every day at 6:00 AM by setting the Trigger Interval to “Days,” the number of days to “1,” and the time to “06:00.”
- This node will fire your workflow automatically every morning without you having to do anything.
Step 3: Add a Weather Data Node
- Click the “+” button on the right side of the Schedule Trigger node to chain the next node.
- Search for “OpenWeather” — this is a pre-built integration in n8n that connects to the OpenWeatherMap API.
- Select the action “Return Current Weather Data.”
Setting Up OpenWeather Credentials: Before you can use the OpenWeather node, you need an API key. Go to openweathermap.org, create a free account, navigate to the API keys section, and copy your key. Back in n8n, click “Create New Credential,” paste your API key into the Access Token field, and save. n8n stores your credentials securely and you can reuse them across multiple workflows without re-entering them.
Configuring the Weather Node: Once your credentials are set up, configure the node with the following options: Data Type set to “Current Weather,” Units set to “Imperial” (or Metric if you prefer Celsius), and Location set to “By Zip Code” — then enter your zip code. Run a test by clicking “Execute Node” and you should see a detailed JSON object in the output panel containing temperature, humidity, wind speed, weather description, and more.
Step 4: Add a Gmail Node to Send Email
- Add the next node and search for “Gmail.”
- Select the action “Send Message.”
- Click “Sign in with Google” to authorize n8n to send emails on your behalf via OAuth — this is secure and does not expose your password to n8n.
Configuring the Email: Set the Recipient to your email address, Subject to “Your Daily Weather Briefing,” and Email Type to “Text.” In the Message field, write something like: Good morning! Here is your weather for today: {{ $json.main.temp }}°F, {{ $json.weather[0].description }}. Humidity is {{ $json.main.humidity }}%. Wind speed: {{ $json.wind.speed }} mph. Have a great day!
Each {{ }} expression pulls a specific value from the OpenWeather node’s output. You can drag and drop field names directly from the input panel into your message to avoid typing errors — just hover over a field name in the data panel and a small drag handle will appear.
Step 5: Test and Activate Your Workflow
- Click “Execute Workflow” at the top to run a manual test. Check your inbox — within a few seconds you should receive the weather briefing email.
- If everything looks good, click the “Active” toggle in the top right to turn on the workflow. From this point on, it will run automatically every morning at 6:00 AM.
- Save your workflow with Ctrl+S (or Cmd+S on Mac).
Congratulations — you have just built your first n8n automation. It is simple, but it demonstrates the core building blocks you will use in every workflow you create: a trigger, one or more action nodes, credentials, and dynamic data expressions.
Beyond the Basics: More Advanced Automation Examples
Once you are comfortable with the fundamentals, the real fun begins. Here are some more advanced automations you can build with n8n to get a sense of what is possible:
Reddit Content Aggregator
Build a workflow that scrapes the top 10 posts from any subreddit every morning, filters out anything below a certain upvote threshold, and sends you a curated digest. Add an AI node to summarize long posts or add commentary, and you have a personalized daily briefing on any topic — whether that is marketing, finance, technology, or a hobby you follow.
YouTube Comment Analyzer
Connect to the YouTube API to pull comments from any video, run them through an OpenAI or Claude node to perform sentiment analysis and surface the most insightful questions or criticisms, and post a summary to a Notion database or send it to Slack. This is a great tool for content creators who want to understand what their audience is really saying without reading thousands of comments manually.
Lead Enrichment and CRM Pipeline
Set up a Webhook trigger in n8n and connect it to your contact form. When someone submits the form, the workflow automatically looks up their company using an enrichment API, scores the lead based on predefined criteria, adds them to your CRM (HubSpot, Salesforce, or Airtable), sends a personalized welcome email, and pings your sales team on Slack with a summary. A task that used to take 10 minutes of manual work now happens in under 3 seconds.
Building Your First AI Agent in n8n
This is where n8n gets truly exciting. The AI Agent node in n8n allows you to connect a large language model to a set of “tools” that it can choose to use autonomously. Unlike a simple automation where every step is predefined, an AI agent decides in real time what to do based on the task at hand.
Here is the basic structure of an n8n AI Agent workflow:
- Trigger: A chat interface, webhook, or scheduled trigger that sends a task or message to the agent.
- AI Agent Node: This is the brain. You choose which LLM powers it (GPT-4, Claude 3, Gemini, etc.) and give it a system prompt that defines its personality, role, and constraints.
- Tools: These are n8n sub-workflows or specific nodes that the agent is allowed to call. For example, you could give the agent a “Search the web” tool, a “Read email” tool, a “Write to Google Doc” tool, and a “Send Slack message” tool. The agent will decide which tools to use and in what order to complete the task.
- Memory: n8n supports different types of memory for agents, including simple buffer memory (remembering the last N messages) and more sophisticated vector store memory (allowing the agent to search through a large history of past interactions).
A practical AI agent you could build today: a personal assistant that monitors your Gmail, identifies emails that need a response, drafts replies based on your communication style, checks your Google Calendar before suggesting meeting times, and sends the drafted reply for your review before sending. This kind of workflow can save hours every week for professionals who live in their inbox.
Tips for Learning n8n Efficiently
The best way to learn n8n is by building real things you actually care about. Start with a workflow that solves a problem you have right now — even something small like getting a daily reminder or auto-archiving emails. The hands-on experience will teach you more in an hour than any course can in a week.
A few practical tips as you get started: use the n8n community forum at community.n8n.io, which has thousands of workflow templates and active discussions. The official n8n documentation is comprehensive and searchable. When you get stuck on data manipulation, the Code node (which runs JavaScript) is your escape hatch — you can do virtually anything with it. And do not be afraid to test nodes individually before connecting them; the ability to run and inspect each node in isolation is one of n8n’s greatest debugging features.
Conclusion
This n8n guide has taken you from the foundational question of “what is n8n” all the way through building your first automation and understanding how AI agents work. By starting with simple, practical workflows and gradually increasing the complexity, you can master the essential capabilities of n8n and start saving real time in your work and personal life.
The most important thing you can do right now is stop reading and start building. Open n8n, pick one repetitive task you do every week, and build a workflow that handles it automatically. It might take you 30 minutes the first time. The next one will take 15. Within a month of consistent practice, you will be building sophisticated AI agent workflows that feel like having a team of digital assistants working around the clock on your behalf.
Whether for personal productivity, business automation, or professional development, n8n offers one of the best returns on learning investment available in the tech landscape today. Start learning n8n now, build your first AI workflows, and unlock the full potential of intelligent automation.
Leave a Reply